Bluehost Web Hosting Help
Email Client Setup: Outlook 2003
This guide will show step-by-step instructions for setting up email on Outlook 2003 for Windows. While it can be used for other versions of Outlook, some screens and steps might vary.
- Select the Tools menu.
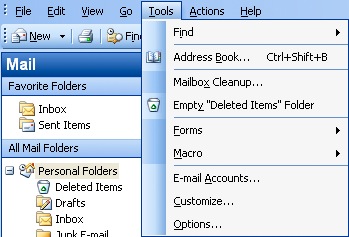
- Select Accounts.
- Choose "Add a new email account".
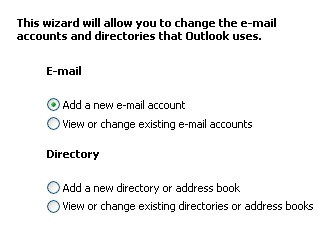
- Click the Next button.
- Please choose your account type. You may select either POP or IMAP. Click here for an explanation on the differences between POP3 and IMAP.
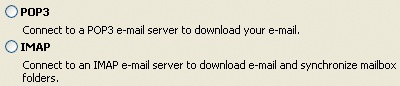
- Click the Next button. This will load the email Accounts window.

- Enter your Name, as you want it to appear on your outbound email messages.
- Type your Email Address.
- Enter your email address as the User Name.
- Enter your email Password.
- Enter mail.example.com as the Mail Server.
- The Outgoing Mail Server is the same as your incoming mail server. Again, this will be something like mail.example.com.
- Click the More Settings button.


Advanced Settings
Once you have clicked the More Settings button you will be presented with a pop-up window with the advanced settings.
- Click the Outgoing Server tab.
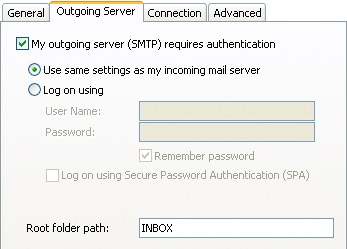
- Click the "My outgoing server (SMTP) requires authentication" checkbox.
- Make sure that it is using the same settings as your incoming mail server.
- Click the Advanced tab.

- If you are using POP3 with SSL, please click the checkbox and select 995 for your port. Otherwise leave the port at 110.
- If you are using IMAP with SSL, please click the checkbox and select 993 for your port. Otherwise leave the port at 143.
- If you are using SMTP with SSL, please click the checkbox and select 465 for your port. Otherwise change the port to 26.
- Click the OK button.
- Click the Next button on the Email Accounts window.
- Click the Finish button.


You should now be able to send and receive email.
 379,340 views
 bookmark
 share
share
 E-mail
 Twitter
 Google Bookmarks
 Facebook
 MySpace
 Digg
Digg Reddit
 Delicious
 LinkedIn
 StumbleUpon
 tags:
tags: Recommended Help Content
Email Application Setup - Outlook Express
Configuring your email client: Outlook Express.
How To Setup Email Account - Client Setup SSL/TLS Settings - POP & IMAP
How to setup your Bluehost-hosted email address with an email application.
Email Application Setup - Outlook 2016 for Mac
How to setup an email account in Outlook 2016 for Mac
Related Help Content
How To Setup Outlook 2013 On Windows - Outlook 2013 Email Guide
How to setup an email account using Microsoft Outlook 2013
Email Application Setup - Outlook 2016 for Windows
How to setup an email account in Outlook 2016 for Windows
Email Application Setup - Outlook 2010 for Windows
How to setup an email account using Microsoft Outlook 2010
Email Application Setup - Outlook 2007 for Windows
How to setup an email account using Microsoft Outlook 2007
Email Client Setup: Outlook 2002
How do I add my Bluehost email account to Outlook 2002?
How To Setup Outlook Email Account - Add New Email Address In Outlook
How to setup an email account in Outlook
How To Check Email - Webmail & Email Applications
So, you want to access your email, eh? You're going to need an email client for that. But what is an email client? Email clients come in two varieties: webmail and email applications.
How To Avoid Outlook IMAP Timeout Errors - Outlook IMAP Email Error
How do I avoid Outlook IMAP timeout errors?